
PICOMI BLOG · OUTFITS & PHOTO PREP
What to Wear for Business Headshots
Do you need a suit? Should you wear your hair up or down? What about your usual glasses? Start with your outfit, then check your hair, makeup and accessories before the shoot.
Pick two tops you would normally wear to meet clients or colleagues. Take a quick phone photo in each, crop them to your chest and compare them side by side. It is easier to see which color suits you and which neckline sits neatly than to decide while staring into your closet.
Do you need a suit and tie?
Start with where the photo will appear. If your company has a dress code for its team page, follow it. Otherwise, look at your colleagues’ headshots. If you normally wear a suit to meet clients, wear that one. If you work in a shirt or sweater, you do not need to switch to a suit just for the photo.
The same goes for a tie. If you are unsure, bring one and take a few shots with and without it before choosing.
For portraits in an office or workspace, think about the outfit and location together. If you are wearing a dark jacket, check whether the background is also dark enough for your shoulders to blend into it.
Check the neckline and shoulders first
Business headshots often crop around the chest, so your neckline, shoulders and any layers underneath will be in the frame. Try a shirt or sweater on its own, then add a jacket and see which you prefer.
Sit down to check the fit
Button your shirt and check for gaps between the buttons across your chest. Try your jacket open and closed: the layer underneath should lie flat when it is open, and the fabric should not pull into obvious creases around the button when it is closed. Raise your arms, then sit down. Make sure the shoulders do not pinch and the collar does not press into your neck.
A loose top can work too, but check your test photo for fabric bunching across your chest or under your arms. If an outfit only looks good while you hold your stomach in or keep pulling down the hem, put it back. You will have enough to think about with your expression.
Crew neck, open collar or shirt collar?
Crew neck: For a more relaxed look, try a plain crew-neck top or lightweight sweater. Either can work under a blazer. Choose a neckline that lies flat without sagging. If it sits too close to your chin, try a slightly wider neckline and take another photo to compare.
V-neck or open-collar shirt: These leave more of your neck visible and add less bulk under a jacket. Sit down and lean forward a little to check whether the neckline drops much lower than it does when you stand. Try your necklace at the same time so the pendant does not catch on the edge.
Shirt collar and jacket lapels: Start here if you need a more formal photo. Once your jacket is on, free any shirt collar caught underneath and flatten both collar points. Choose whether to wear a tie based on your workplace. Without one, check that the collar sits neatly with the top button undone.
Turtleneck: Try a lightweight knit first. A thick turtleneck under a jacket can bunch around your neck. If you have long hair, move one side behind your shoulder and check again. If the collar reaches your chin when you sit down or needs constant adjusting, choose another top.
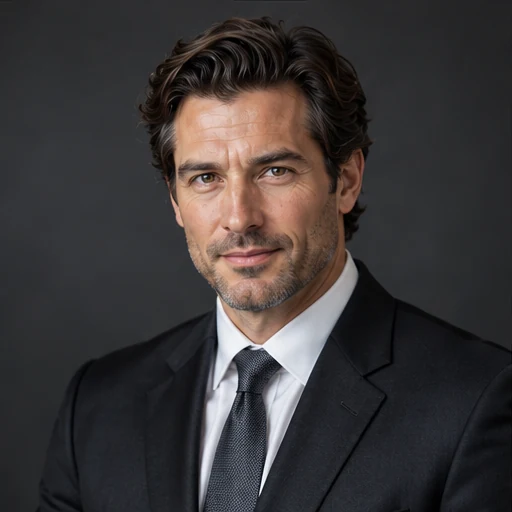
Shirt collar & lapels
Once the jacket is on, straighten any collar caught underneath.

Open-collar shirt
Sit down to check that the neckline does not drop too low.
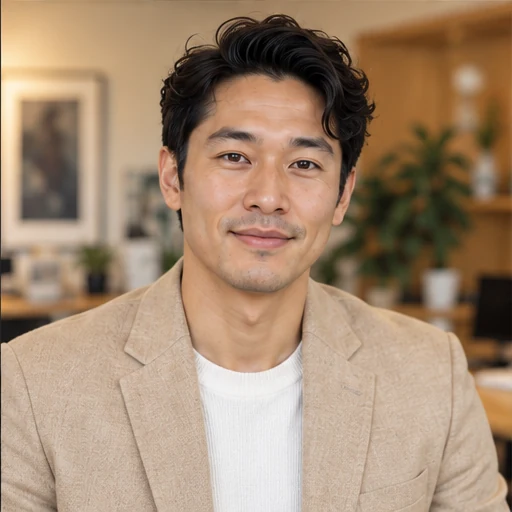
Crew-neck top
Check the neckline for sagging or pilling.
Unsure about color? Try one light and one dark top
Start with solid colors you already wear, such as navy, gray, beige or white. A white shirt under a dark jacket makes the collar easy to distinguish from the jacket. With a dark top, check the background too so your shoulders do not disappear into it.
If you like bright colors, take a test photo to see how the color looks beside your face. With a bold top, keep earrings and necklaces simple. View the test photo at a small size: do you notice your face first, or a large pattern or logo on your chest?
Check the fabric while you are wearing it
A shirt or lightweight knit is a useful place to start. Check whether it clings or shows the layer underneath. For shiny fabric or a small, busy pattern, take a test photo to see whether reflections or the pattern draw too much attention. Bring a plain top as a backup if you are unsure.
Before leaving, use a lint roller on dark clothes, check knits for pilling, and iron shirt collars and button plackets. Carry spare outfits on hangers where possible so you do not have to deal with fresh creases at the studio.
Wear your hair the way you usually like it
Save a first attempt at a new hairstyle for another day. If you need a haircut, leave a few days to get used to it. Wash your hair according to your usual routine: if it gets especially fluffy straight after washing, you do not need to wash it just before leaving.
Hair up or down? Check with your outfit on
With long hair, try moving it behind your shoulders, or keeping one side in front and the other behind. See which leaves your neckline visible. If your hair covers the jacket lapels completely, try a half-up style or low ponytail. You do not need to sweep your bangs away; just tidy any strands falling into your eyes or across your mouth.
Style curls as you normally would, separate tangled strands and check for hair caught in your collar. There is no need to straighten it for the shoot.
Check the edges of short hair and facial hair
After styling short hair, check your temples and the back of your head for stray sections sticking up. Start with a little styling wax and add more only if needed, rather than letting it clump.
If you have a beard, tidy the edges and any noticeably long hairs. If shaving usually leaves your skin red, do not leave it until just before the shoot.
Give your hair one last check after dressing. Pulling on a top or putting on a jacket can undo some of your styling.
Stick with makeup you know
If you do not usually wear makeup, you can go without it for a headshot. If you do, use products and a look you have tried before. Shoot day is not the best time to try a new foundation or false lashes for the first time.
Apply a thin layer of base, then add coverage where you need it. Check for a color difference between your jaw and neck, and for makeup collecting around your nose or mouth. If your face gets oily, gently blot it before touching up those areas rather than adding powder all over again.
Brush your brows into place, lightly fill any gaps and separate mascara clumps. Choose a lip color you are comfortable wearing. Before the photo, check for lipstick outside the lip line or on your teeth.
If you are wearing a pullover, get dressed before doing your makeup so foundation or lipstick does not rub onto the neckline.
Keep your glasses; try accessories with your outfit
Glasses
If you usually wear glasses, wear your everyday pair. There is no need to switch. Clean the lenses and check that the frames sit straight. If they keep sliding down, get them adjusted beforehand so you do not have to push them up every few shots.
Earrings and necklaces
If you cannot decide which earrings to wear, start with studs or small hoops. With long earrings, turn your head to check whether they catch in your hair or brush your collar.
Put your necklace on after your top. Avoid a pendant that lands right on the neckline or gets caught between shirt buttons. You can skip the necklace if you already have a tie or a detailed neckline.
If your hands will be in the photo, check your watch, bracelets and rings too. Rest your hands on a table and see whether a bracelet slides onto the back of your hand or your watch turns inward.
Do bottoms and shoes matter for a headshot?
For a head-and-shoulders photo, comfortable bottoms and shoes are enough. If you also want half-body or full-length portraits, try the complete outfit and check it both standing and sitting.
Your waistband should not dig in when you sit. Empty your pockets of your phone, keys and bulky wallet. With a skirt, check whether it rides up or needs constant pulling down. Wear shoes you are used to, and walk a few steps in the full outfit to make sure your trouser hems or skirt do not drag.
What should you do with your hands and expression?
Stand comfortably, breathe out and let your shoulders drop. You do not need to keep pushing your chest out or tucking your chin in. When the photographer asks you to turn, move your feet and body a little together rather than twisting only your neck.
For seated photos, give your feet somewhere steady to rest, then straighten your hem and lapels. If you do not know what to do with your hands, rest them on your lap or place one lightly over the other. When crossing your arms, avoid clenching your fingers or lifting your shoulders.
Start with the smile you would use to greet someone. If it feels stiff after a few shots, pause and relax your jaw before trying again. You do not have to hold the same smile throughout the session.
A few checks before you leave
- Clothes: Straighten your collar, remove lint from your shoulders and check the buttons.
- Face and hair: Move hair away from your eyes, check for lipstick on your teeth and clean your glasses.
- Bring: A comb, your usual hair clips, a lint roller and any makeup you need for touch-ups. Hang spare outfits rather than stuffing them into a bag.